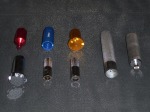
Ford uses special nuts to hold various switches and bezels throughout your Classic Ford Mustang. Most of them can be found on your Mustang’s dash. Ford could have used plain nuts, but they would have not looked that great. They designed shiny chromed nuts to be look more appealing to the eye. Over the years, most of these have been removed with a flat blade screw driver and a hammer. It does not take much to make them look like they have been chewed on. Luckily, most of these special bezel nuts are being reproduce, and there are tools that are made specifically to remove and install them. Most other Classic Fords used the same style of bezel nuts, so the tools can be used on most of them as well. Drake Automotive Group (aka Scott Drake) has made these tools over the past few years, and even came out with new improved color anodized versions. The use of these tools are simple to use, but do not over tighten the nuts. Just tighten enough, so the switches to do not try to spin. Throughout my 18 years of restoration experience, I have made some of my own specialty tools to make my job easier.
Two of the tools are shown in the pictures below. One of them, I did not make, and I would probably be sued by its inventor if I said so. The paper clip that I’m referring to, can be used to remove the ignition switch key cylinder. This is done by first turning the ignition switch all the way to the accessory position. Then insert the paper clip into the tiny hole on the face, and at the same time slowly continue to turn the key passed the accessory position. You should be able to pull the key cylinder out. You are pushing a tiny set pin in the cylinder to release it. If your are replacing either the key cylinder or the switch, remember that everything must be set one position passed accessory. The new ignition switch can be set by inserting a flat blade screw driver inside, and turning it counter clock wise until it stops. The key cylinder can be set by using the same procedure as removal, but you will have to set it by eye. If you look at the back side of the key cylinder, you will see a tiny dimple and brass pin. Make sure the pin is set into the dimple by using the paper clip. Then insert the new cylinder the same way you pulled the old one out. Turn to the off position to lock it back into place. Not following this procedure by owner or by would-be thieves have damaged some of these dash openings. This is where the second home made tool is used. I simply use some thick washers slightly bigger than the opening and a bolt and nut. Insert a washer on the back side and front side, and tighten them down slowly. Next, pull them apart and check the results. Repeat unit the open is flat again. This will ensure that the ignition bezel seats properly, and the switch does not spin in the dash. This same trick can be used on the door jamb switch opening as well. Be sure to check out the restoration tools section of a Scott Drake catalog, and you will be surprised with what tools are available.
Tool List:
- 1965-1966 wiper switch bezel and 1965-1970 headlight switch tool – Part # T-110-RD
- 1965-1968 fog lamp switch bezel tool – Part # T-65
- 1967 convertible top switch bezel tool – Part # T-67
- 1967-1968 ignition switch bezel tool – Part # T-100-YL
- 1969 ignition switch bezel tool – Part # T-109
- 1965 wiper arm bezel tool – Part # T-120-BL


